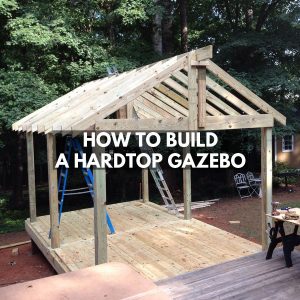
How to Build a Hardtop Gazebo from Scratch
To build a hardtop gazebo from scratch begins with knowing exactly what kind of gazebo design you want and where you want to put it. Once you have these two things figured out you can start to look for the plans and source materials to get started.
Gazebo’s come in all shapes and sizes but the majority of them are either square, hexagonal, or octagonal. If you are building your first ever hardtop gazebo out of wood then I would recommend you start with a square shape unless you have carpentry or building experience. To decide on the shape of your gazebo you can get inspiration from places like Fifth Room or Pinterest.
Once you know what style of gazebo you want you can start to assess the location where you plan to place it. We have a whole post about the best place to position a gazebo so we won’t go into too much detail but you should think very carefully about this before doing any work. If you can consider factors such as lighting, views, privacy, and convenience then you are less likely to have any regrets about where you build it.
After deciding on the shape and positioning of your soon-to-be gazebo you should have a pretty good idea about the size. Once you know the size and shape you can start to plan out the details or look for a guide that matches your ideas. To do all the measurements yourself you can first create markers on the ground where your posts will go to get a feel for how big it will be and then put pen to paper.
Drawing your own plans to build a gazebo isn’t hard but it is easy to overthink it if you don’t have much experience. While it does help to have a scale drawing, a simple sketch will suffice. Start with the legs and then consider where the beams will join and how the screws will intersect with each other. Use a scale of 1 foot for 1 inch or 1 meter for 10 cm when drawing your plans so that you can take accurate measurements before ordering your supplies.
Materials You Need to Build a Hardtop Gazebo from Scratch
- Post timber
- Beams timber
- Sleeper screws or coach bolts
- Postcrete
- Roofing sheets
- Screws
Once you have your plans for your gazebo and all your tools, you need to source your materials from a local DIY shop or lumbar yard.
When ordering timber, it is better for the posts and beams to be a little longer than necessary as you can always cut them to size but you can’t add more on. It is worth knowing that around 1/3rd of the post’s total length should be in the ground so for a 2-meter high roof, you should order posts around 2.8 – 3 meters long.
The posts should be treated to be used outdoors and thick enough to support the weight of the structure. The beams don’t have to be as thick as the posts but it will help with the aesthetics if they are.
You will need some timber screws long enough to reach through your thickest timber and secure into the next one. I like to use sleeper bolts designed to be used with railway sleepers as they are long and strong.

Tools You Need to Build a Hardtop Gazebo from Scratch
- Electric drill/screwdriver
- Ladder
- Spirit level
- Drain shovel or post hole digger
- Saw
10 Steps for Building a Hardtop Gazebo
Step 1: Level the ground. Whether you plan to lay patio slabs, decking, or just leave the ground bare then having a flat surface to start with is always a big help further down the line. It helps with measurements, balance on ladders, and putting furniture on when it is finished.
Step 2: Cut the poles to length. Decide how tall you want your roof and how much of a slant it will have and then cut the poles to size. Bear in mind that you should have around 1/3rd of the pole’s length below ground for stability.
Step 3: Dig the post holes. You can mark the post positions with stakes and take measurements using string to make sure your holes are in the right place. Using your drain spade or post-hole diggers to make the holes will save you from digging a massive hole that will ultimately require more postcrete than s necessary.
Step 4: Place the posts in and fill them with postcrete. Using a tape measure, ensure the depth of the hole will allow the correct length of wood to remain above ground. You can put gravel at the bottom of the hole to improve drainage and help resist rotting from sitting in water when it rains.
Step 5: Once the posts are at the correct depth you can empty the postcrete into the hole up until about 5 – 10 cm below the surface. Tip in a few liters of water and give the mixture a stir then make sure the post is level before leaving it to set in the correct position.. You may need to use supports to keep the post upright but it should be fine most of the time.
Step 6: Once the postcrete has set and the posts are in position you can start measuring the beams to be cut to size. Always be sure to measure at the top of the posts and not the bottom. Depending on your joinery experience you may want to cut notches in the wood to give the joints more strength.
Step 7: Drill pilot holes for the bolts to fit through and tighten them up. With coach screws and bolts, the pilot hole should be around half of the diameter of the screw or bolt. If you are using sleeper screws, some of them don’t require a pilot hole so check with your local hardware store to see what they recommend. Use a washer to prevent the screw or bolt from going too far and digging into the wood.
Step 8: Attach all the beams. You will need someone to help with this step as it is almost impossible to hold a beam in position and screw it together on a ladder by yourself. Using your chosen screws or bolts, make sure you enter the beams as centrally as possible and avoid crossing screws too close to one another.
Step 9: Add the roofing sheets by overlapping each sheet in the direction you would like water to flow. If you have used a central beam or beams then you can screw them down in the middle as well as the ends for durability.
Step 10: Sand down any rough or sharp edges and treat the wood with a varnish or oil for protection and enjoy your new gazebo with a drink and some good company.
We hope you have found this article helpful in learning how to build a hardtop gazebo from scratch but if you need more detailed plans you can check out these 7 free gazebo plans.